
Character Creation
Shard includes a rich character sheet to make it easy to create and manage your D&D characters. This introduction walks through the steps of creating a new character.
New Character

Use the NEW CHARACTER button to create a new character.
The My Characters section shows your characters. Click on any of the characters to see their character sheet. If the list of characters becomes too long then only the most recent characters will be shown. Click ALL CHARACTERS to see full the list of characters and delete any you no longer want.

New character dialog
To create a new character you just need to assign a name. You can use the initial randomly generated name, click the RANDOM NAME button to create a new random name, or type your own name for your character. If you want to choose a name based on your race then you can choose a new randomly generated name later after you have chosen your race.

Empty Character Sheet
Gray labels below character name show options required to complete the character sheet.
A new character jumps right to the character sheet. To create your character pick the options for the character. Missing information is highlighted at the top of the character sheet. The information can be filled in any order and can of course be changed even after your initial selections. As your character advances in level these boxes may reappear to indicate new options that need to be selected, for example new spells.
Pick Race

Click on a race to see the information about the race. Click the Select button when you find your choice of race.
Clicking Pick Race will bring up the select race dialog. Here you can browse the races, read about the race and then select your desired race. Note: for some races, like Elf, you must pick a subrace. For those a list of subraces will display to allow you to make your selection.

Selected Race dialog allows you to pick options specific to the race
After you select your race you will see your selected race along with any additional options available. For races that provide a list of names you can select a race specific name. Click any of the generated names to change the name of your character. The “Allow selection for all abilities” allows you to override the default ability score increases and select any abilities in their place.
Pick Background
Selecting a background works much the same as selecting a race.

Select Background Dialog
Pick Class

Select Class Dialog
Selecting a class starts much the same as selecting a race or background.

Character Levels
Since characters get options by class level and can have multiple classes the dialog is organized by levels
After you pick the class the options for the class can be set on the character levels dialog. Options are displayed by character level. In order to advance the character level click the Add Level button. You can then choose to advance in the current class or pick another class if you want to create a character with multiple classes. Hint: if you want to change the initial class of a character click the delete (trashcan) button and click add level to set the starting class.
Pick Abilities
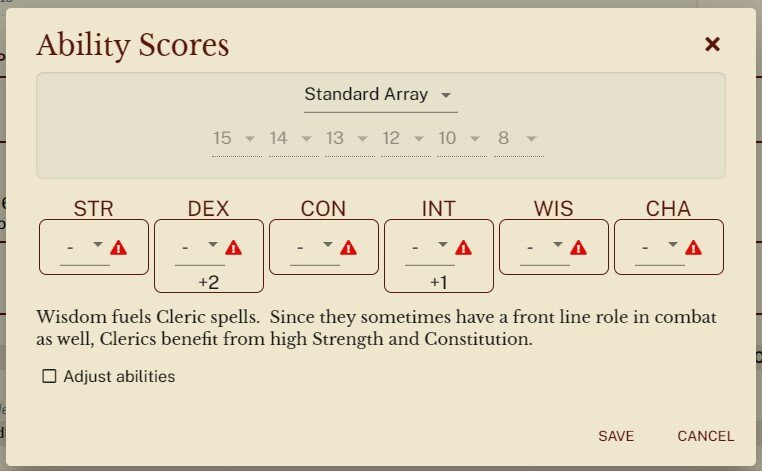
Pick ability scores
Picking ability scores allows you to select ability scores using a variety of methods:
Standard Array: allows you to select from the standard array of scores.
Point Buy: allows you to select scores using the points. The points for each score are shown along with how many points have been used.
Roll Scores: allows you to randomly roll ability scores using different rolling techniques using either 6 (standard) rolls or best of 7 rolls:
Standard: best of 4d6.
Hero: 2d6+6 which will generally produce high ability scores.
Classic: 3d6 which will generally produce a wide range of scores.
Freeform: set any values you want for ability scores.
Any bonuses from class or race will be displayed so that you can see what your final scores will be. If you have selected your class then you will receive hints around what skills are most important for you class.
Clicking adjust abilities, will display additional settings allowing you to apply your own bonuses or alter the maximum values allowed.
Pick Starting Equipment
After selecting your class and background you can pick starting equipment (both influence starting equipment options). The starting equipment option allows you to pick from the starting equipment options or select gold instead to buy your own equipment.

Starting Equipment Dialog
Use the checkbox to pick between options separated by a vertical line.
Hint: if you remove all of your items and treasure then the pick starting equipment option will reappear.
Pick Spells
For classes that pick spells you will also have the option to select spells.

Spell Picker
The spell picker dialog makes it easy to select spells. Type in a name or filter to find spells.
The spell list defaults to show the spells available for your class. You can choose to ignore the spells defined by the rules and select from the full list by clicking ALL. You can also just see what you have selected by clicking SELECTED. Filters can be specified by ritual status, school of magic or spell level. You can also type into the search box to find a specific named spell.
If your class has both known spells and requires spells to be prepared, like Wizard, then there will be an additional checkbox to prepare the spells. The character sheet will only show prepared spells for classes that require preparation.

You can change spells at any time by going to the class section and clicking the spells button.
Character Token
All characters can have an assigned token. This token will display on the character sheet and on any maps that the character is placed in a campaign. The token will resize automatically based on the size of the character. There are several ways to assign a token.
Upload Token: this will allow you to upload an image from your computer. You can create a border and assign a background, if the image is transparent) or just use the image unchanged.
Search the Web: this will allow you to search the web for images for your character. Once you find an image you can assign a border and a background the same as if you uploaded the image.
Pick Token: this will allow you to search tokens that have already been created. Use this to see default tokens or find a token that you have already created.

Token Creation Dialog
Conclusion
There may be additional options to select based on your class, but they all follow the same patterns shown above. Additional traits about you character can be added to develop rich details about your character’s appearance, backstory, and personality. You can now go adventuring with your character.